1. နိဒါန်း
This manual provides comprehensive instructions for the installation, operation, and maintenance of your CFTGIW NEO NAS DS01Z Door/Window Sensor Alarm. This device is designed to enhance your home security by detecting the opening and closing of doors and windows, integrating seamlessly with Z-Wave 300 and 500 series systems. Please read this manual thoroughly before using the product to ensure proper function and safety.
2. အထုပ်အကြောင်းအရာများ
အောက်တွင်ဖော်ပြထားသော ပစ္စည်းများအားလုံးကို သင့်ပက်ကေ့ဂျ်တွင် ရှိနေကြောင်း အတည်ပြုပါ-
- NEO NAS DS01Z Door/Window Sensor Alarm Main Body
- NEO NAS DS01Z Door/Window Sensor Alarm Deputy Body (Magnet)
- Installation Accessory Kit (Screws, adhesive tape)
- အသုံးပြုသူလက်စွဲ
3. ကုန်ပစ္စည်းကျော်view
The CFTGIW NEO NAS DS01Z is a compact and discreet sensor designed to monitor the open/closed status of doors, windows, cabinets, and drawers. It consists of two main parts: the main sensor unit and a magnetic deputy unit.
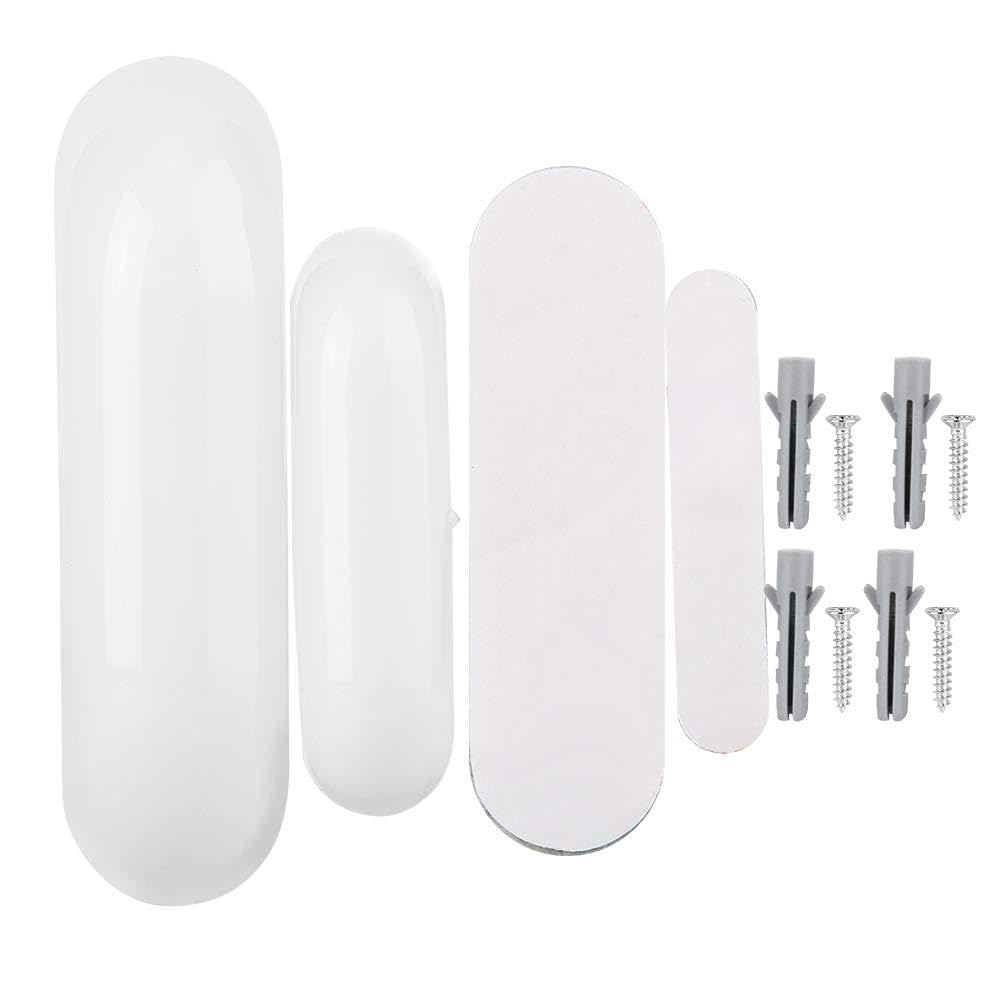
ပုံ 1- NEO NAS DS01Z Door/Window Sensor Alarm. This image shows the main sensor unit and the smaller magnetic deputy unit, typically installed on a door or window frame and the moving part, respectively.
အဓိကအင်္ဂါရပ်များ-
- ယုံကြည်စိတ်ချရသော ထောက်လှမ်းမှု- Provides precise open/close status for secured entry points.
- ချက်ခြင်းသတိပေးချက်များ- Notifies users immediately via smartphone or laptop upon detection of an unexpected opening.
- Enhanced Z-Wave Plus: Utilizes 500 series chip for faster and more secure communication.
- သတိထား ဒီဇိုင်း- Compact and stylish, blending seamlessly with home decor.
- စိတ်ကြိုက်ပြင်ဆင်ခြင်း- Integrates with Z-Wave communication for automated responses (e.g., turning on lights).
- လိုက်ဖက်မှု- Works with leading alarm systems such as SmartThings, Vera, Zipato, and Iris.
4. သတ်မှတ်ချက်များ
| အမှတ်တံဆိပ် | CFTGIW |
| မော်ဒယ်နံပါတ် | CFTGIWmvgdi4g9re-02 |
| ပစ္စည်း | ABS ပလပ်စတစ် |
| Working Frequency (EU Version) | 868.4MHz |
| Working Frequency (US Version) | 908.4MHz |
| လိုက်ဖက်မှု | Z-Wave 300 series and 500 series |
| အပိုင်းအခြား | Up to 50m outdoors, 30m indoors |
| ပါဝါအရင်းအမြစ် | CR2 ဘက်ထရီ |
| Standby Current | 1uA |
| ဘက်ထရီသက်တမ်း | ၈ နှစ်ခန့် |
| အလုပ်အပူချိန် | 0-40 ℃ (32-104°F) |
| Main Body Dimensions (L*W*H) | Approx. 70 x 20 x 20mm (2.8 x 0.8 x 0.8in) |
| Deputy Body Dimensions (L*W*H) | Approx. 40 x 11 x 11mm (1.6 x 0.4 x 0.4in) |
| ပစ္စည်းအလေးချိန် | ၀၃၅ အောင်စ |
5. တပ်ဆင်ခြင်းနှင့် တပ်ဆင်ခြင်း။
5.1 ဘက်ထရီ တပ်ဆင်ခြင်း။
- Gently open the main sensor unit casing.
- CR2 ဘက်ထရီကို ထည့်ပါ။ ဘက်ထရီ၏ ဝင်ရိုးစွန်းမှန်ကန်မှု (+/-) သေချာပါစေ။
- c ကိုပိတ်ပါ။asing လုံခြုံစွာ။
5.2 Z-Wave Network Inclusion (Pairing)
To integrate the sensor into your Z-Wave network:
- Place your Z-Wave controller (hub) into inclusion (pairing) mode. Refer to your controller's manual for specific instructions.
- Within 1.5 seconds, press the Z-Wave button on the main sensor unit three times quickly. The LED indicator will flash to confirm inclusion mode.
- The sensor will attempt to pair with your controller. Once successfully paired, the LED will stop flashing and remain solid for a few seconds before turning off.
- If inclusion fails, the LED will flash rapidly for a longer period. Repeat the process.
5.3 ရုပ်ပိုင်းဆိုင်ရာ တပ်ဆင်ခြင်း။
Install the sensor on a door or window frame using the provided adhesive tape or screws.
- Mount the main sensor unit on the fixed part of the door/window frame.
- Mount the magnetic deputy unit on the moving part of the door/window.
- Ensure the two units are aligned and the gap between them is no more than 10mm (0.4 inches) when the door/window is closed.
- Test the sensor by opening and closing the door/window to confirm detection.
6. စစ်ဆင်ရေး
6.1 Monitoring Door/Window Status
Once installed and paired, the sensor will automatically detect when the door or window it is attached to is opened or closed. This status change is immediately communicated to your Z-Wave controller.
- ဖွင့်ရန်- When the magnetic deputy unit moves away from the main sensor unit, the sensor reports an "open" status.
- ပိတ်သည်- When the magnetic deputy unit is close to the main sensor unit, the sensor reports a "closed" status.
6.2 Receiving Alerts
Depending on your Z-Wave controller's configuration, you can receive instant notifications on your smartphone or other devices when the sensor detects an opening. Configure these alerts within your Z-Wave hub's application.
6.3 Z-Wave Network Exclusion (Unpairing)
To remove the sensor from your Z-Wave network:
- Place your Z-Wave controller into exclusion (unpairing) mode.
- Within 1.5 seconds, press the Z-Wave button on the main sensor unit three times quickly. The LED indicator will flash to confirm exclusion mode.
- The sensor will attempt to unpair. Once successfully excluded, the LED will stop flashing.
7. ပြုပြင်ထိန်းသိမ်းမှု
7.1 ဘက်ထရီ အစားထိုးခြင်း။
The sensor is powered by a CR2 battery with an approximate life of 2.2 years. When the battery is low, the sensor will typically send a low battery alert to your Z-Wave controller. Replace the battery as follows:
- Gently open the main sensor unit casing.
- CR2 ဘက်ထရီအဟောင်းကို ဖယ်ရှားပါ။
- Insert a new CR2 battery, observing correct polarity.
- c ကိုပိတ်ပါ။asing လုံခြုံစွာ။
7.2 သန့်ရှင်းရေး
Wipe the sensor with a soft, dry cloth. Do not use liquid cleaners or abrasive materials, as these can damage the device.
၃
| ပြဿနာ | ဖြစ်နိုင်သော အကြောင်းတရား | ဖြေရှင်းချက် |
|---|---|---|
| Sensor not pairing with Z-Wave controller. |
|
|
| Sensor not detecting open/close events. |
|
|
| တိုတောင်းသောဘက်ထရီသက်တမ်း။ |
|
|
9. အာမခံနှင့် ပံ့ပိုးမှု
For warranty information and technical support, please refer to the documentation provided with your purchase or contact CFTGIW customer service through the retailer where the product was purchased. Keep your proof of purchase for warranty claims.


